Came upon incompatibility issues editing Sony VENICE MXF files in Premiere Pro CC? Convert them first. Here’s a quick guide walking you through the process of converting Sony VENICE XAVC files to Premiere Pro CC’s favorite H.264 .mov format.
VENICE features an all-new Full-Frame sensor with the classic 36 x 24mm dimensions that have been a staple of photography for over 100 years. Designed exclusively for high-end cinematography, this sensor can capture images up to a maximum resolution of 6048 x 4032. The stunning full 6K resolution of the camera can be recorded directly in X-OCN file format. Also, XAVC 4K can be captured onto SxS cards while still sampling from the full 6K resolution of the sensor. The Sony VENICE records MXF (Media Exchange Format) files – up to 1920 x 1080 Full HD at 50Mbps – to relatively inexpensive and widely available CompactFlash memory cards. Relay Recording across two card slots allow filming to continue without interruption, whilst Double. The Sony VENICE records MXF file wrapper that ensures the widest compatibility with existing industry infrastructure, metadata and non-linear editing (NLE) systems.
“Hi all, I need to make a short movie for sharing via my friends, but the Premiere Pro CC 2016 won’t import my Sony VENICE MXF footage from the SxS card. What other way would you suggest to get the footage to work on my MacBook Pro in Premiere Pro CC? Thanks for your help!”
If for whatever reason you are unable to load Sony VENICE 4K footage into Premiere Pro CC for editing, you can transcode them to a format that is compatible with Premiere Pro CC first, such as Adobe’s favorite editing codec – H.264 and MPEG-2 Codec, which Premiere Pro will recognize and handle well. Let’s take a look at how to do this.
In a nutshell, you can use Acrok Video Converter Ultimate to convert Sony VENICE XAVC (.mxf) files to MOV so as to import them to Pemiere Pro CC for further editing. This video conversion program fully supports Windows 10, Windows 8 and Windows 7. And thanks to the leading acceleration technology, now the video conversion speed is up to 30X faster while remaining high output video quality. In addition to MXF video, this video converter also can convert 4K videos such as MOV, MP4, MTS, etc. and standard video files such as MP4, MOV, WMV, MKV, FLV, AVI, 3GP, M4V, ASF, VOB and more. Download the right version here and follow the instructions below to convert camcorder Sony VENICE MXF video to H.264 MOV with ease. (Mac users please download the Mac version, which is compatible with the latest Mojave .)
Free download Sony VENICE MXF Video Converter


Transcode Sony VENICE MXF for Premiere Pro CC
Step 1: First Get 4K MXF video files from Sony VENICE to your PC. Connect the VENICE to your PC with a USB cable. Once connected and powered on, the camcorder should appear on the desktop as a new disk. It is desirable that you copy the video to your PC’s hard-drive before converting or editing it. Next, download an install the 4K MXF video converter, then open it and add the MXF files you want to convert in the following two ways:
1> Click Add Files to browse and choose videos from your computer’s hard drive for loading to the 4K Video Converter.
2> Directly drag video clips to the program for conversion.
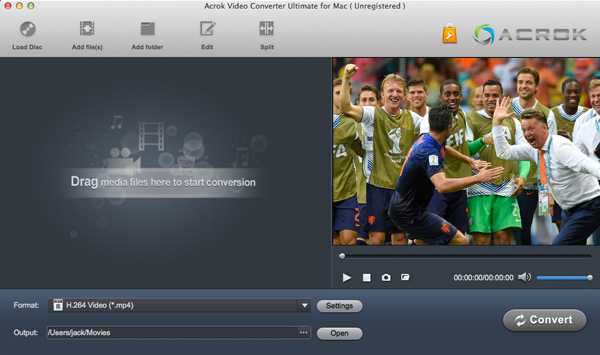
All the added video files can be previewed with the built-in video player and you’re free to take snapshots of your favorite movie scenes. If you want to merge multiple files into one big file, please click “Settings” button then check out “Merge all files into one” on the main interface.
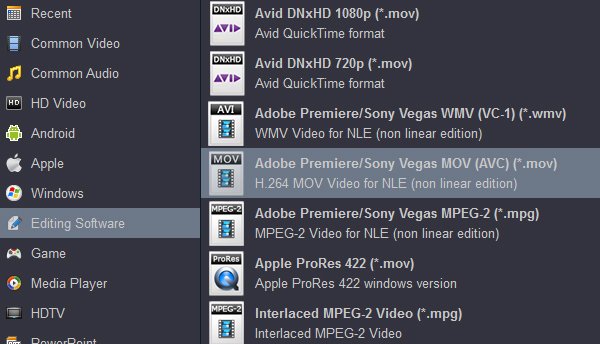
Step 2: Click “Format” pull down list to select “Editing Software > Adobe Premiere/Sony Vegas H.264 AVC(*.mov)” as the best video format for Premiere Pro CC. MOV format is the best choice for you. You can click Settings to adjust video and audio parameters to get the best quality video. If your editing software supports 4K resolution videos, you need to choose “Orginal” in Resolution option.
Step 3: When you’re satisfied with all settings, click Convert to start converting the added videos to MOV. And now it’s done. Hassle-free way, right? Why not download it and have a try?

About the author